Thursday, May 31, 2007

Modifiers and Drying Skeins

Before I get to the latest modifier I tried with the Cutch dye, here is a picture (on the left) of the very simple skein drying rack I have. It is simply a left over length of PVC pipe that is hung using rope tied to the canopy at either end. I simply slide the skeins on. Today was the first day we have had early morning sun and I discovered that the skeins are in full sun for about 30 minutes. Of course, this is low, early morning sun but still. After taking the pictures I slid them into the shade.

The next picture on the right is a closer picture of the medium and light DOS* and the three skeins that were modified with a soda ash rinse. I will post a picture later on of the dark, medium, and light DOS skeins from this batch. The first batch of Cutch I used hydrogen peroxide as an additive to darken the colors. I rather liked the effect. The book did not say how much to use, just 2% hydrogen peroxide added to the last 15 minutes. I thought the standard household hydrogen peroxide was 2% but it is actually 3%. When I calculated 2% hydrogen peroxide based on WOF* I got about 2 drops to add. That didn't make sense to me so I added 100 ml. I could see the dyebath change when I added it. I have a feeling that less would have been just as well. That would be something to test in the future as I do like the colors I got. The current batch is without the hydrogen peroxide added and I changed the DOS percentages. The first batch I used 4%, 6%, and 12% for light, medium, and dark DOS. I didn't think it was enough of a difference in the final result so with the second batch I used 2%, 6%, and 18% for light, medium, and dark DOS. I like the results.
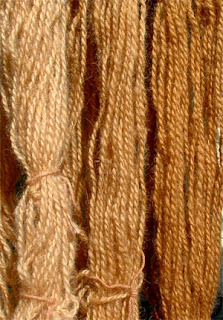
The picture on the left here is a close-up of the soda ash modified skeins. Now soda ash is generally used with cellulose fibers, not protein fibers*. Soda ash is alkaline and caustic. If too much is used with protein fibers, it will dissolve them. The book mentioned that a soda ash rinse reddens Cutch. I used 2% WOF for the amount of soda ash and proceeded as for an iron after-bath. That is I heated water, added the dissolved soda ash, and then swished the skeins in the bath until I saw the color change. Actually what I saw was the soda ash reddening the Cutch but also stripping the dye from the skeins! The skeins had been washed and rinsed until the water ran clear before I put them in the bath. The color did not redden and the skeins are slightly paler than the originals. I may have done something wrong or it may just not be appropriate for protein fibers. I will have to consult my mentor. Dana any ideas? I will say that I rinsed the skeins after the soda ash bath and I was concerned about the soda ash affecting the wool yarn so I added a quick splash of vinegar to neutralize. That may have done something too. So intriguing!
I have a Pomegranate dyebath going at the moment. It is another dull color but tomorrow I will be dyeing with Cochineal bugs! I have been looking forward to it. Lush color too! I will post pictures of the final results of the Cutch dyeing tomorrow, and the Pomegranate as soon as it is done.
No question for today. -Renee
* please see glossary

Tuesday, May 29, 2007

The Dream Skein Winder v. 1.2-Final

Here is is. The final version of the Dream Skein Winder in action. I now have a working, motorized, 6 skein-skein winder! I am ready to go into production mode now. This is the first prototype of course. I am neither highly skilled in construction nor an engineer so I am sure it is pretty crude, but I made it, and it works.
I used it to wind more skeins for another Cutch batch. Below is a picture of the motor which is on the left side of the winder in the back. I used a Louet spinning wheel driveband to connect it to the motor. So, one problem solved, several million to go....
I had a lot of fun building it!
What have you adapted or built to carry out your fiber tasks?-Renee

Sunday, May 27, 2007

Cutch Yarn Picture

Here is the picture of the finished Cutch dyed yarns. As you can see, there really is not much of a shade difference although you can tell which yarns are the dark DOS. The three skeins that look greyish are the iron modified ones. The color actually looks brownish grey. All the Cutch dyebath had hydrogen peroxide added during the last 15 minutes to darken the color. So, since I forgot to do skeins for the additional modifier I wanted to do and I would like to see if I could get more of a difference in the DOS, I decided to do Cutch again. This time I will not add hydrogen peroxide and I will step away from the dyeing book guidelines and make my DOS percentages more widely spread. This is what makes dyeing so fun! One note I would like to mention about my experience with natural dyes and with Earthues natural dye extracts is the richness of the colors, even the dull ones. I have also dyed with various chemical dyes and, in my opinion, they just don't have the same richness and character the natural dyes have. Well, tomorrow will not have a post but I will catch up on Tuesday.
Have you tried dyeing with natural dyes? -Renee

Saturday, May 26, 2007

Cutch and Poppies

Today is a day of rest for us. We have been going day and night for several weeks now and needed the downtime. It felt great to sleep in to 6:30 am then take a nap after a bit, read, and play around with whatever we wanted to work on. I gave the skeins dyed with Cutch a final wash and then did the iron modifier. This a picture of one of the Cutch dyebaths to show the difference in the final product. Cutch takes a full 2 hour simmer to "bite" onto the fiber. Kind of like the slow caramelizing of sugar. It hangs around in the pot looking a lovely golden yellow color and then all of a sudden toward the end it turns caramel like. I will have a picture of the final results tomorrow. I did make another mistake...sigh. When I looked at my storyboard to see how many skeins I needed, I was in a hurry and didn't look carefully enough. I neglected to dye skeins for another modifier bath so I will have to do a special session with just one skein of each DOS. That makes three separate dye pots with one skein each that requires a two hour simmer, rats. The Dream Skein Winder has moved to v. 1.2 with the addition of bracing and is working beautifully. I have taken these first dye batches slowly to work through the process and get a feel for it. With the skein winder up and running (pictures soon to come) I will wind and wash all the skeins so that I will be able to mordant a weeks work of skeins at a time and be more efficient. I will need to be to get through all the dyeing before weather and lack of light shuts my outside dye area down. The next dyepot will be Pomegranate. I am getting some of the duller colors out of the way. After Pomegranate will come the ones I have been dying to get to, Cochineal, Lac, and Madder. Things will be looking a lot brighter then (yep, I see the puns, go ahead and groan if you would like!).
Speaking of bright, the poppies suddenly bloomed and I couldn't resist taking pictures. I thought this picture would make a wonderful source of inspiration, or a great inspirational challenge!
On the weaving and spinning front, my loom is still half threaded with the next Yarn Stash Challenge warp. Things have slowed to make room for getting the dye project going. I have had a problem with the warp yarns for the first time since starting the challenge. My solution, I do just a little at a time and before I know it, it is threaded and up and running. More about that later. The dog fur/alpaca yarn is still being spun in between things too.
As this weekend is Memorial Day, my husband and I will be going to the Memorial Day service at a local cemetery where my husband will play TAPS, always a moving experience and we do our little part to honor those who have given their lives to serve, regardless of politics, race, gender, or religion.
Where do you find your inspiration? -Renee

Friday, May 25, 2007

Mud Cloth and Tying Up Loose Ends

Here is the picture of my "mud cloth" sample. I had started to fill in the background so I would have a negative space design but ran out of time. That's OK, I got a feel for it. As we were driving home, Vivian was wondering what to do with our little mud cloth patch. Mine is about 5" x 5". I decided that I would let the mud cure, overdye the fabric with Madder and sew it to a handwoven tote bag. Michele had some mud cloth fabric that they had made that had been overdyed with Madder and I really liked the looks of it.
I checked the Earthues website last night and didn't see any reference to the mud cloth but I also Googled for Mali mud cloth. In fact, Google very helpfully inserted the keywords into the search box even though I know I have never done a search on it before. I put a link to the Smithsonian exhibit on my Fiber Links list. If you decide to purchase Mali mud cloth for yourself I have the following pleas; Please make sure, as much as you are able to, that the makers receive a fair wage. If you possibly can, please support a female artist. The men are worthy too but the women have a more difficult time getting paid as well for the same level of skill and time.
A few posts back, Dana had asked me how many pots I had to dye with and I haven't responded to that so I will do this now while the Cutch dyed yarns are being dyed. I have three stainless steel stockpots. One is smaller than the others and is perfect for dyeing the 5 skeins at a time I have been dyeing recently. As I mentioned before I use an old enamel canning pot to put the iron modifier bath in. I have one large propane burner and two tanks so I can keep going when one tank runs out of fuel. I would like to get another burner so that I can have two dyepots going at once. I may even consider a double burner so that I can have all three. Three pots are just as easy to watch as one. I have many 5 gallon plastic pails that come in handy for staging the yarns, either before or after dyeing. I also have assorted stainless steel, wood, and plastic stirrers, whisks, and sticks. I have a scale which is essential, mine is digital. I also have a set of scientific graduated measuring beakers in plastic. When the cutch dyeing is finished I will take a picture of the skeins hanging on the set-up I use to dry them.
Well, off to get the next batch of Cutch going and spin and weave!
A note to those readers who may not be familiar with some of the terms I use. I have put a glossary in one of the sidebars and will be adding to it from time to time.
Stay tuned for the Cutch results!
My question for today: Do you have a cause that you support? I have three that are dear to my heart. One is the promotion of peace, safety, and economic security for women and girls, the other is to stop cruelty toward animals, and the final is to promote and protect the well being of our planet. It is all connected you know!
-Renee

Thursday, May 24, 2007

Seattle Weavers Guild, Errors, and Triumphs

Oh my, what a day! My head is still spinning from all I have seen and done and am in the process of doing at the moment. Today was the Seattle Weavers Guild meeting. I drove down to Seattle this morning with my friend Vivian and we chatted the whole way down and back home. So nice to have a chunk of time to do that. As I mentioned yesterday, the morning and afternoon program for the guild was none other than Michele Whipplinger from Earthues. The morning program was on "The Creative Elements of Bogolan Cloth." Bogolan or bogolanfini cloth is mudcloth and is created in the African country of Mali. Michele and Kathy traveled to the country about 2 years ago and Michele presented a stunning slide show of the trip. It looked and sounded like a difficult journey. Two years ago Mali was the fifth poorest nation in the world. Now it is the second poorest. I believe Michele said the average life expectancy is 41 to 43 years. In spite of the hardships the people and their cloth portrayed in the slides were beautiful. I was moved by the beauty and joy in the faces of the people, and the cloth they make using the simplest of tools and materials is stunning. The process of making such cloth, however, is quite time consuming. It takes about 2 months of patient labor to create. That doesn't factor in the year it takes to process the mud before it is even applied to the cloth! I don't have pictures but I will look up what I can and direct you to what I find. Start with Michele's Earthues website which is listed in my fiber links.
For the afternoon program we got to try our hand at a bit of mudcloth making. Michele and Kathy had brought back a huge roll of the narrow, handwoven cotton cloth from Mali that they use. That was a story in and of itself. To our astonishment, they cut small pieces off of the roll for us to use. We each had a stick that had been cut and smoothed by Sandra from her yard, and a small dish of "mud". The interesting thing about the mudcloth designs is that they use the negative space as the design focus rather than the positive space that we Westerners are used to seeing. The designs also told a bit of the lore and history of the people who make the cloth. Vivian and I were a bit pressed for time so I quickly laid down a design without giving it a lot of thought. I will post a picture tomorrow but try not to be too disappointed! We were reducing a two month process into 20 minutes so it is only a very distant echo of the actual cloth. It did give us a small taste or feel for it. We carefully carried our "mudcloth" to the car and then headed over to the Weaving Works where we found several of our fellow guild members prowling the store as well. I picked up a few things as did Vivian and then we headed home.
Yesterday, I mordanted the next batch of skeins so I could start the Cutch dyeing today. Right after dinner I headed out to the dye area and made my calculations. I discovered an error in the last batch. I have been keeping rather careful notes with dates and the different tasks separated. When I did my calculations for the Chestnut dye I mistakenly looked at the WOF for the Walnut dyed yarn, which was cotton and weighed quite a bit more. My WOF was off for the Chestnut dye. So I suspect I have a medium and dark DOS rather than light and dark DOS. The iron bath was calculated using the same WOF too. It wasn't off by that much when it is all broken down but still, I have no more Chestnut at this time so I will just have to make a note of the error. I have a dark DOS dyebath of Cutch going at the moment. Cutch needs a two hour simmer time and an overnight soak to achieve its full dye potential. There is also a note to add 2% Hydrogen Peroxide to the dyebath 15 minutes before the end to achieve a darker shade. I will try it although no amount is mentioned. My timer keeps going off at 10 minute intervals to check the dyebath so this post is taking a bit longer to create.
That leaves the "Triumph" part to tell about. One of the items I picked up today at the Weaving Works was a spinning wheel drive band for the Lendrum wheel. I wanted to use it for my Dream Skein Winder. I got home and slipped it on, and by sheer dumb luck it fit perfectly! Not only that, when I connected the sewing machine peddle to the motor and plugged it in... IT WORKED!!!! Now all I need to do is give it a little bracing and make a proper yarn cone holder and guide and then I have my first working, motorized, 6 skeins at a time, Dream Skein Winder v. 1.1. I will post a picture when the rest of the bits are added. I warn you, it is crude looking but it does the job. It works!
Well, it has been quite a day and I have a dyepot to tend to and a couple of weaving magazines to look at so I will leave you with this question to think about: How do you handle mistakes or errors when they arise (and they do!)? I will give you my personal answer this time and that is, for me, it depends. Most of the time I give it some thought, learn from it, try to salvage what I can, and move on. There are times though when I am tired, stressed, or just plain cranky and I have to either a) throw or break a few non-essential things or, b) put it all aside for a while and enjoy a glass of whine, er, that is wine, and a bit of chocolate. Then I can go back and do the first part! -Off to find the chocolate, Renee
One final note: any errors or misinterpretation in the information on the Bogolan Cloth are my own and not due to our excellent speaker!

Wednesday, May 23, 2007

Nutty Dyes

Here are the pictures from the Chestnut plus Iron modifier dye bath and the Walnut dye bath, which I did a week or so ago. The Chestnut picture is on the right. The light DOS skeins are on the far right of the picture and the dark DOS on the left. The skeins that were modified with an iron bath are the greenish/grey ones on top. The pictures don't do the colors justice. It is really hard to capture the richness of the colors, even dull (in my opinion) colors such as these.

The Walnut dyed skeins are in the picture on the left. English Walnut hulls dye a tan color. This is a cotton yarn that I scoured before dyeing (see older post). The walnut hulls had sat in a bucket of water since last fall. The lighter skein on top is the unscoured cotton yarn. Not terribly exciting to someone who likes more intense colors as I do but interesting. I am thinking of overdyeing the skeins after the Earthues project is done.
I forgot to mention an additional note about water yesterday. I used distilled water to dye with the Chestnut. I took note of how much water I used and did some calculations and about fainted when I saw the cost. Let's just say that the cost of the distilled water would cost more than the dye extracts and yarn...together! I have decided to use filtered water from my local food Co-op. I have used this with Earthues extracts before and was quite pleased with the result. The cost is reasonable too.
I have also added a new link to the Fiber links list. It is for Whidbey Weavers Guild. The website is still under construction but I will let you know when it is done.
Yesterday I started spinning the Twill fur/alpaca blend that I carded on Monday. The fibers spin quite easily. I am spinning the fiber using a woolen technique. I believe I heard it called American Long Draw. I will have to check my notes on that one. I am spinning it fairly fine and am still deciding what to make with the yarn. Perhaps I will do a SIMPLE knitting project with it, inspired by Elizabeth and Mike.
I also spent part of the day working on the Dream Skein Winder v. 1.1 (see older posts). It is almost done, just a few more parts to get and put on. In the meantime, I can still use it manually and it does save me a bit of time winding.
Tomorrow I will be heading out the door first thing to go to the Seattle Weavers Guild meeting. The program is none other than Michele Whipplinger of Earthues herself so I naturally don't want to miss that. We will be making a flying stop at the Weaving Works in Seattle before heading back home. So now off to wind and wash skeins for the Cutch dyebath.
Do you belong to a fiber group or Guild? If so, what inspiration do you get from your fellow members? -Renee

Tuesday, May 22, 2007

Dyeing Safely and Other Bits and Pieces


Here is a picture of a few bits of equipment that I use when dyeing. I really want to point out the mask, safety glasses, and gloves. I am pretty fanatical about safety. I am sure my mother will be happy to read that. I have safety gear for the many things I do. I wear safety glasses and ear protection when weed-eating, building, jewelry making, and dyeing (no ear protection when dyeing unless using blender!). I wear earplugs even when vacuuming the house. I have safety gear for the more risky things I do such as mountain biking and climbing, and, even though I am working with non-toxic natural dyes, I have and use safety gear when dyeing.
Most of the extracts are in powdered form. It is never a good idea to inhale particles even if they are non-toxic so I always use a mask when handling them. The glasses prevent splashes from getting in my eyes and the gloves prevent skin irritation and having my hands stained. Toxins can be absorbed through the skin. I wear protective clothing too. Just because something is natural, doesn't mean it can't harm you! This may seem like a no brainer but sometimes we forget. Take the rhubarb plant for instance. The stalk is edible the leaves are poisonous. Rhubarb contains oxalic acid and the leaves and root make an excellent mordant, or so I have read. You do not want to stand over a pot of rhubarb mordant or dye, and you handle it with great care because of the toxins it contains.
In addition, I do not use my natural dyes, or any kind of dye, in the kitchen. All the pots and utensils I use are dedicated to dyeing and are stored in a different area. I just don't feel the risk is worth it.
I do compost my spent natural dye bath. I pour the mordant bath down the drain to the septic. I only use alum for a mordant which is considered safe to handle but not to ingest of course. This is the accepted way of disposal. Mordants such as copper and tin are highly toxic and should be considered hazardous waste. I do not use these mordants at this time. One of the reasons I like using the percentage method with your WOF and DOS calculated is that it cuts down on waste of dyes and mordant.
That is my speech on safety for the day! Yesterday I went to my local spinning group in the morning and got the alpaca and dog fur carded and ready to spin. When I got home, I put a skein of each chestnut DOS in an iron modifier bath. I really liked the results. The light DOS came out a lovely medium grey with a slight greenish cast. The medium DOS came out a dark grey/green color that I really like. Iron deepens and saddens the color. I was pleasantly surprised with the way it reacted with the Chestnut dye. To use the iron bath, I calculated WOF with 2% iron powder to get the amount of iron needed. I heated enough water to cover two skeins in an old enamel kettle to 130 degrees F. This kettle will now only be used for iron as it will be ruined for any other dyeing. I had been warned about this ahead of time so I picked a pot I knew I would be dedicating to iron. When the water had heated I added the iron that had been dissolved in a bit of boiling water, straining it through a coffee filter into the pot. Then I simply swished the skeins around until I saw the color change. It didn't take very long, about 30- 60 seconds at the most, and, of course, I had on my safety gear!
I will post a picture of the skeins tomorrow as well as the walnut dyed cotton. Until then, Think about the activities in your life that should be done with safety gear. Are you covered? If not, a bit of gear is really a very inexpensive investment that will repay you with a higher quality of health and life. Yours in safety, -Renee

Monday, May 21, 2007

Climbing, visiting, spinning, dyeing

The title pretty much sums up our weekend! We spent most of the day Saturday climbing Mt. Erie, or at least part of it. The day started out stormy but dried up as we arrived. What a view! We were able to see out over the Puget Sound and down the length of Whidbey Island from our perch on the mountain. Eagles kept soaring directly overhead. As I was climbing and rappelling off the walls, I could see plants and flowers growing in the pockets and cracks of the rock. It was a fantastic experience. We had to rush out to meet our visitors, our nephew Mike and his girlfriend, and now adopted niece, Elizabeth. We had a wonderful visit but one of the highlights was the fact that Elizabeth is a knitter! She was in the process of knitting the most lovely pair of socks. The yarn is a soft green alpaca or alpaca blend and she is knitting it in a delicate lacy pattern. The perfect socks for spring. Of course, I had to show Elizabeth how to spin. After all, she will be able to spin her own yarn then(!)...so here she is spinning her first yarn.

We had a wonderful visit all around. Thanks guys!
Elizabeth also has a knitting blog, www.castonacupcake.blogspot.com. I have added it to my fiber links list. Do take a look at her knitting projects when you have the chance.
In the meantime, the dyeing did happen. When we arrived home from climbing we found the canopy covering the dye area had blown over and knocked over one of the dyepots that had sat overnight. Thank goodness for the natural non-toxic dyes. I wasn't concerned to have the stuff all over the ground. The yarn was just fine. I washed and hung the skeins to dry. Chestnut dyes a light greeny-yellow. I used a bit of chestnut extract I had from a previous purchase. I didn't have enough to do a dark DOS. I ended up dyeing a batch of light and medium DOS. I will see if I can get my hands on a bit more chestnut as some of the color mixes I want to do call for it. I found the colors hard to photograph but here they are.
Chestnut makes a good base dye to overdye with other colors. I have a skein of each to use an iron modifier on and then the indigo.
Today my local spinning group meets so I will cut short this post and get going. I am bringing the dog fur and alpaca to card together to spin then it is back to dyeing. Cutch is next on the list. The question I will leave you with today is: What are the ways you have passed on the fiber tradition? Do you demonstrate your craft in public? Teach? I know so many of you do. We need to keep the knowledge and skill going and I always feel that passing it on is the best way to show my appreciation to those who have taught me. -Renee

Friday, May 18, 2007

The first dye batch

Today is the day the first batch of skeins goes into the actual dye. Yesterday I mordanted 15 skeins using alum. sulfate. I also had the walnut dye bath that I had made earlier so I went to my yarn stash to see what I could find to use it on. I found a cone of natural cotton. As with many of the cones purchased from one weaver's sale or another, it has no label. The cotton looked pretty raw still, meaning that it wasn't a glossy smooth mercerized cotton or anything. I decided I better scour it. While the wool was in the mordant bath, I skeined off the cone and got it ready to scour as soon as the mordanting was done. I took a picture of it which I will post with the finished skeins from today's dyeing. After scouring the water was quite dirty so I am glad I took the time to do that. I gave the cotton a good rinse and then popped the skeins into the walnut dye pot. I brought the temperature up to 180 degrees F and held it at the temperature for an hour occasionally moving the skeins around. When the hour was up, I turned the heat off and have let it sit overnight. This afternoon I will rinse and hang the skeins up to dry.
I have added a glossary to the blog and the Loreena McKennitt link. I will be posting a bit on safety in dyeing and on copyright as well soon.
We have had an unexpected change, or I should say addition, of plans for this weekend. We already had a pretty full schedule but our nephew from California and his girlfriend will be swinging by on a visit. I am looking forward to it! I may not be posting until Monday. I will have pictures to post and a lot to tell as well.
Do you have the proper safety equipment in your studio?
Until the next post, -Renee

Thursday, May 17, 2007

Winding Skeins and Inspiration

Yesterday, in spite of the fact my Dream Skein Winder is still being refined, I used it to wind the skeins for the first dye batch. I went ahead and turned the winder manually. I have to say the winder holds a lot of promise. I was able to wind six skeins at once fairly easily and that is without a cone holder or yarn guide. I just set the cones on the ground!
I am starting out slowly to just work through the process to shake the bugs out so to speak and see where the process needs to be streamlined, as I have a lot of dyeing to do. I am starting with Chestnut extract. It just so happened to be the first card on the storyboard. I didn't put them in any particular order but since Chestnut is pretty straight forward I thought it would be a good one to start with. I will be dyeing 5 skeins at a light DOS, 5 at medium, 5 at dark DOS. One skein at each shade will be the single color skein, one skein of each shade will continue to be processed with an iron modifier, and three skeins of each shade will be dipped in indigo at a later date.
I washed the skeins thoroughly using hot water and Orvus Paste, being very careful not to agitate the wool and to keep the water at the same temperature. In other words, do NOT wash in hot water and then rinse in cold. Unless you are trying to felt your fibers of course. The yarn I am using, Henry's Attic Crown Colony 2-ply is 100% wool and has a lot of lanolin in it still. I changed the wash water three times and then rinsed and left the yarn soaking in clean water over night. That brings me to the issue of water.
Water plays a key role in how well the dye takes. We are on well water and it is very hard and contains rust. I am washing the yarn in our well water for now to see how it works but I will be mordanting and dyeing using distilled water for best results. I may even have to wash the yarn in filtered water or even distilled water. I would love to build a little dye house that I can not only have a permanent place to dye but can collect rain water off the roof (which would be metal) to use for dyeing. Rain is something we have plenty of in Western Washington. In the meantime, I am doing just fine with what I have.
Today I will mordant the skeins using alum sulfate and then let them soak over night in the mordant bath before dyeing. Did I mention that patience is needed when working with natural dyes and extracts? As the dyeing cranks up, I will probably mordant enough skeins for a week of dyeing at once. We shall see how it goes.
Last night we went to Bellingham to see Loreena McKennitt in concert. The old theater was packed and it was really hard to move around. Inspiration was everywhere last night. I listen to her music quite a bit when doing mundane tasks that don't need a lot of attention. I love her blend of cultures and instruments and her voice is wonderful. The colors used on the stage last night were lush. They were glowing, heavily saturated hues that are often associated with Asian and Indian textiles and peacock feathers. The background had a sheer, textured drape that was reminiscent of a tent or yurt.
I was talking about fear and art yesterday. Although the music and set was superb, the concert had a few hitches. Talk about being in the public eye! Most of my mistakes happen in the privacy of my own home. There was a heckler in the audience that threw her off for a moment. She has been on an international tour, going non-stop for the last few months, and last night was the second to last stop. You could tell she was very tired and there was definitely a weird vibe in the audience. I know that performers pick up on that. She also had to stop in the middle of one song due to some technical difficulties with the sound system. She did what most artists do, she gathered her dignity and continued on even though she was visibly upset by the heckler. She gave us an excellent concert and two encore performances at the end. Grace under fire. I am thankful that most of the time I don't have to overcome my fears in front of an audience of that size!
I will be taking pictures as the dye project gets underway and I will be putting a glossary side bar up on the blog with some of the terms I am using for those who are not familiar with dyeing. Stay tuned!
I will be adding a link to Loreena McKennitt's website in the personal links section.
Where do you draw your inspiration from?
Colorfully yours, -Renee

Wednesday, May 16, 2007

The War of Art and Climbing Through Fear

I have had a lot of very kind and supportive comments recently. They remind me not only how giving other people can be but how much of a positive impact the comments, no matter how small, can have. It makes me determined to remember to pass the treasure on.
I have to say that I am no different from any other creative person. I have to overcome the same fears that can prevent a person from getting started, taking the plunge, and moving forward. Fortunately for us weavers and fiber artists, there is a lot of people out there who have gone before us and left us tools to break through our personal and artistic barriers.
Last year the Seattle Weavers Guild had Mary Zicafoose come to give a workshop and program. Needless to say, as those of you familiar with her and her work already know, the program was excellent. She had a book that she often quoted from and gave us the title. It is called "The War of Art" by Steven Pressfield. I have read it several times as it is an easy read and I find the book inspiring. I really think the book should be called the War of Resistance because resistance, whether it is to an idea, getting started, getting out of bed, or even finishing a project, is the biggest force we all fight. Steven Pressfield is a writer so much of the book draws from his experience in that medium but his words apply to all. It is a book that I in turn have recommended and even given as a gift.
I will give you one quote from his book on fear. "The amateur believes he must overcome his fear; then he can do his work. The professional knows that fear can never be overcome. He knows that there is no such thing as a fearless warrior, or a dread-free artist."
I have recently had this illustrated to me in an area that doesn't really seem to be related to art but it is connected. Last fall I started rock climbing, in the gym. A lot of people ask me why a 45 year old woman would want to start rock climbing. The are even more incredulous when they find out I am afraid of heights! So why rock climbing? It intrigued me for years but I let the fear of height thing stop me for a long time. I finally got tired of the fear and realized that it wasn't going to go away so I might as well do it anyway. I immediately fell in love with the sport. For me, and other climbers, there is a wonderful mind/body connection that climbing has. You have to use your mind as well as your body and that is good for both. When I first started climbing in the gym, my fear would only let me get about half way up the wall. Every time I climbed a route I would go one rock higher, until I finally got to the top. I can get to the top now with ease.
Here is the point I want to make of all this, the fear is still there. It hasn't gone away. Every time I climb I have to battle the fear and I still love to climb. Art is the same way. Every time I start a new project, I have to overcome the resistance of starting...and ending it. Some projects are easier than others of course. The bigger, and more public, the project the more fear and resistance. Climbing has taught me that I can do it anyway and even enjoy it.
I am not the only weaver or artist who also climbs. I personally know a couple of other women who are weavers and who also enjoy rock climbing and more. I am beginning to think that there is more of a connection than first appears on the surface.
I am going to start rock climbing outside soon as I love to be out in nature. I am looking forward to the challenge.
So, time to prepare the first skeins to be dyed with Chestnut extract.
Check out the "War of Art" by Steven Pressfield if you haven't already. The ISBN is 0-446-69143-7.
What are some of the fears you have "climbed" through? Think back and realize what you have accomplished and know that you have it in you to continue on, even through the fear.
One other thing I love about rock climbing is how well it lends itself to metaphors for life.
Climb on! -Renee

Tuesday, May 15, 2007

Skagit Weavers Guild Meeting

Last night was the meeting for Skagit Weavers Guild. The guild is one of two that I attend that have night meetings. This is wonderful for those weavers who work outside the home or have kids. It can be tough on some who find it more of a challenge to get out at night. This time of the year the sun stays out late so that even at 9:00pm or 9:30pm there is still a bit of light in the sky.
One of the benefits of living in the Pacific Northwest is that we have an incredible and skillful pool of local fiber artists to draw from. Many of these people teach all over the country and even internationally. Our speaker last night was no exception.
Our program was given by Linda Malan who is a weaver, teacher, international artist and specializes in tablet weaving. The bands she brought to show us were exquisite. I had a hard time taking my eyes off the two tablet woven necklaces she was wearing! I thought they had a very contemporary and clean modern look to them and yet the pattern in the woven bands gave a sense of history. Hard to explain, they just looked "right" and satisfied the eye. They also dangled an incentive to explore tablet weaving myself, after I am through with the current challenges on my plate of course!
Speaking of challenges, I stood in front of my storyboard yesterday with a notepad and started to rough out my first day of dyeing. Now, I know this is not a project that will be easily done overnight or in one weekend. I mentioned before that I am a visual person and I like storyboarding because it organizes everything visually. One of the drawbacks to that is it puts everything in your face, literally. That can be overwhelming. I should also mention that the storyboard is 5 ft. 1 1/2" tall x 5 ft. wide. Yes, I measured. I am 5 ft. 1 1/2" tall as well (the doctor measured) so I am looking at a project outline that is as big as I am! Yesterday, as I was standing in front of the storyboard, the sheer amount of dyeing time it represented reached out and slapped me in the face. It looks like I will be dyeing for three solid months, every day!
After I recovered a moment from the amount of work I was looking at in just the dyeing alone, I also realized it represented an incredible learning opportunity. The work will be satisfying and I know it will take me to places I didn't expect. So there is nothing to do but roll up the sleeves and go forward. I am grateful and feel very lucky I get to do this project. I am going to seize the moment and run with it.
What are some of the unexpected places your projects have led you to?
Off to roll up the sleeves again. -Renee

Monday, May 14, 2007

The Storyboard: at last

Here is the first picture of the completed storyboard. The only wall I had where I could hang it is across the greatroom from my studio loft to the other loft. The storyboard is about 5'x5'. You can see the categories, and all the index cards are the dyes and variations. On each card is the category it belongs to, the dye or dyes, the form of the dye or dyes, the mordant to be used, the color that I am trying to achieve, depth of shade,and page references to needed instructions. In the upper right-hand corner of each card is a number that gives the number of skeins needed for that particular dye or color. One thing that I added as a result of storyboarding. I realized that I forgot to factor in Depth of Shade (DOS). That changed the number of skeins needed dramatically and made me decide that I didn't need gradations or a yarn-painting category. I have my hands full with all that I have so far! There are three depth of shades; light, medium, and dark. When you start combining them in the color mix category, for example, light DOS for one dye and medium DOS for another, you get nine possible combinations (LL,LM,LD,ML,MM,MD,DL,DM,DD). Therefore each color mix will have nine skeins. For Indigo, I plan to show the effect of one to three dips for every skein I over-dye. Add the DOS for each over-dyed skein and I get nine variations for each one. Well, as you can see the skeins needed multiplied alarmingly. I started out wondering how I would use up 375 skeins. As the whole concept exploded in my brain I realized I needed more yarn. The final tally? 609! I will need to order eight more pounds of yarn. I considered cutting things back. I could just try the dye modifiers on the medium DOS but the fact is I have this opportunity and I want to get as much out of it as possible. So, I will order more yarn.
This picture is a closeup of the Color Mixes category. It is very difficult to take a good picture as there is only a very narrow walkway between the wall and the edge. You can kind of see the general layout of the cards. From the storyboard, I will be able to see how many skeins to dye using a light DOS of madder from roots with an alum mordant. I can do all the skeins needed in one batch rather than making a batch for one category then having to make another batch for the next category when I get to it. So that means all the light DOS madder root skeins with alum mordant I need for the Modifiers and Indigo will be already done when I get to those categories. It will be the same for all the dyes and depth of shades.
I hope this makes sense. It would be so much easier for me to just show it to everyone on the storyboard. Perhaps I will be able to come up with a way to do that on this blog.
I plan to make a tag label on the computer to fill out for each skein rather than have to write it all out by hand 609 times. I will take the info for the tag right off the storyboard. The storyboard will stay up for the duration of the project. Yes, I have a very understanding husband! I think most of us fiber people have understanding mates.
I realize that some of the color combinations will be very close to the same with certain dyes. I decided that will be OK with me. It will be interesting to see if there are slight variations and, as I will be using the yarn for tapestry weaving, it will all be usable.
Well, the storyboard is done. Now to see how many skeins I need to dye a light DOS of madder using roots and alum mordant.....
How do you celebrate when you accomplish an important step in your work, i.e. getting that warp on and threaded, getting the fiber carded, finishing a lengthy task?
If you will excuse me, I think some chocolate is in order! -Renee

My Links

I am going to make two posts today. Before I get to the storyboarding I wanted quickly mention my links. In the Fiber Links section I have a few fiber-related links for you to check out. There are a couple of weaving organizations and then a few personal favorites. WeaveCast is a podcast published by Syne Mitchell. I first met Syne at the Seattle Weavers guild and we were both manning the till for the fall guild sale. I had a wonderful conversation with her. I doubt she remembers me as it has been a few years and the guild so big that I don't run into her often. She was a beginning weaver at the time and has become quite accomplished. What impressed me the most is that she is a published Science Fiction writer. Science Fiction is my favorite genre to read! Now she has podcasts on weaving. Check her out.
Another link is to a blog by my friend and mentor in dyeing, Dana. She has a graphic arts background and her pictures, observations, and dye projects are great to look at. She packs a lot of knowledge into her workshops.
The other link I just added today. It is to Robyn Spady's website. Robyn is a dynamic teacher and speaker and has a master level Certificate of Excellence (COE) from the Handweavers Guild of America. Add to all that the fact that she is a wonderful person to know and talk to.
Below the Fiber Links are my Personal Links. My husbands music website I have already mentioned. The other two have a lot of personal meaning to me and tie in with my weaving path. I will be talking about them another time. In the meantime, take a look!
Links have the great property of leading you to new adventures and thoughts.
Have you followed a series of links lately to new discoveries?
-Renee

Saturday, May 12, 2007

A Tribute to Mothers and Fiberart Traditions

While there are some weavers and fiber artists who are the first in their family line to practice these arts, many of us come from a long line of weavers, seamstresses, quilters, knitters, spinners, and so on. I am no exception. I do not know of any weavers in my immediate ancestry, but I am sure there were somewhere up the line. My great grandmothers, grandmothers, and mother were, and are, seamstresses and quilters.
I had three great-grandmothers that I remembered. One was from England and often gave us a baggie with mini-marshmallows and chocolate chips to eat on the way home from visiting. I mainly remember her accent, her bun, and the butterscotch candies she also gave us. My maternal great-grandmother I only knew by her voice on the phone. I didn’t meet her until I was 15 years old and she was on her deathbed. The great-grandmother I remember the most was my Grandma Myrtle. Her house was where the big family feasts were once held and us kids would run under the quilting frame she sometimes had set up. She was always very kind and loving to us kids and her cooking was the good solid kind with homemade rolls and pies and all. I still have a quilt made by her and a quilt top.
One grandmother tried to teach me to knit. I remember the knitting needles were big, bright green, and made of wood. The yarn was a shocking pink and was acrylic. I must confess I never have progressed much beyond the knit and the purl. That same grandmother crocheted the most beautiful doilies from fine crochet thread and made huge braided wool rugs. When she passed on, I got a box filled with cut rag strips and a partially braided rug. I plan to weave a wool rag rug with those strips soon.
My other grandmother, my mother’s mother, sewed. She worked in a garment factory. I remember her taking me there once or twice and introducing me to the ladies. I must have been fairly young as the memories are rather vague. I can still recall the smell though.
My mother sews. She sewed most of my clothes when I was growing up. I have many memories of going to the, then, dreaded fabric store. She would look through the patterns and then would have me look at a few that she was considering for me. She always told me not to look at the color or print in the picture but to look at the line and shape of the dress. After choosing the pattern she would walk through the fabric store to find just the right fabric with me in tow. Occasionally she would stop and hold a bolt of fabric up to my chin to see how the color would look. I would wrinkle my nose from the starchy smell. She would then squeeze a handful of fabric together to see how badly it wrinkled. If all went well we went home with the makings of a new outfit for me, but my trials were not over. I still had to endure pattern fittings, pinnings, and then the pinning of the hem.
What I didn’t realize then, but certainly do now, is that my mother gave me excellent training in clothing design. Alas, the sewing gene didn’t kick in for me until I was in college. My poor mom also had to put up with a tomboy for a daughter. I didn’t (and still don’t) like pink and I didn’t like frilly things. To this day I mainly prefer and wear jeans to dresses. I believe the last garment my mother sewed for me was my wedding dress. Even that was a rather plain and simple affair. No meringue confection of a dress for me.
My mother still sews. She got to have one more chance at sewing little girl's clothing for a granddaughter but that granddaughter now has a daughter of her own.
So, Mom, Thank you. Thank you for passing down the fiber tradition to me even though it took so long to root.
Happy Mother’s Day to you and all my grand moms.
I love you, -Renee

To everyone else:
What are the fiber skills that have been passed down from your mothers in your family?

Dream Skein Winder v. 1.0

Here is the first version of the motorized skein winder I built. The picture was taken in haste and it shows but you can see the basics. The sewing machine motor is attached at the bottom left and I placed the foot pedal in front, backwards. The next picture will be a little better. I wanted to get this posted today.
This is the first version because there are "design issues" that need to be resolved. I wanted it portable and light weight which is one of the reasons I built it using PVC. It actually works pretty well except for two problems. The PVC uprights are just too flexible when the skein winder spins. I also need to get a good drive belt to turn the skein winder. As built now, I could turn it by hand and make six skeins at once. I do need to build a cone holder with a yarn guide. I am hoping to get to that tomorrow.
The pipe section at the top with the little nubs are T-fittings to attach the beginning and end of the yarn skein to. If needed, I can insert short sections of pipe to hold the yarn and pop them out to remove the skein. Speaking of removing the skeins, the end of the skein winder is not glued so that it can be popped off and the skeins can be slid off. Since the pipe is flexible it will slightly collapse to allow the skeins to come off.
So, the improvements I will need to make is to make the side supports out of a more ridged material. Back to the drawing board so to speak!
Failures, or near failures are important learning opportunities.
How have you learned from your past "failures"?
-Renee, who lives in a world of "learning opportunities!"

Friday, May 11, 2007

Storyboarding: Part 2

I am just about finished with the storyboarding process. I must admit, I can only work on it so long before my eyes start to cross and the brain fogs up. To begin with, here is the list of dyes I will be using in the project:
Cochineal extract, Cochineal bugs, Madder extract, Madder roots, Lac extract, Lac sticklac,
Weld flowers, Weld extract, Quercitron, Indigo, Fustic, Logwood Purple, Logwood Grey, Pomegranate, Cutch, Osage Orange, Chestnut, Quebracho Red. Eighteen different dyestuffs in all.
For mordants I will be using alum sulfate, alum acetate, and alum plus cream of tartar. The modifiers I will be using will be iron and possibly soda ash, citric acid, and vinegar. Put all these together in the different permutations and throw in combining the dyes to achieve more colors and you can start to see why my eyes start to cross! Once I get through the basic colors, color mixing, color modifiers, and the indigo dyeing and overdyeing, I will pick some of the colors to do gradations and then a bit of yarn painting. As I work with each dyepot and post pictures of the skeins, I will include a bit of information about the dyestuff used. That takes me to copyright laws. Before posting all this information, I will be going over copyright laws and what I will need to do to adhere to them. Much of my information at this stage will be coming from the materials provided by Earthues and I want to make sure I give the proper credit not only by law, but out of respect as well. The bulk of the dyeing for this project will be done from now until the weather shuts me down sometime in the fall. For the WWG grant, I promised a notebook complete with samples, notes, and my research on the materials I will be using, for the guild library. I will be creating a notebook for myself as well of course. Most of the additional research will be done over the winter and I am thinking I will be posting a lot of it now and then in this blog for others who are interested in dyeing.
In the meantime, weaving is still happening. I am putting another warp on for my Great Yarn Stash Challenge but the next warp I want to put on will be a special one. More on that later!
I have Twill fur washed and ready to combine with some Alpaca fiber I found in my stash that is close to the same color as her fur.
Household projects are coming up, such as a new shower to replace the one I literally ripped out the other week, and in between, the joys of mountain biking, climbing, and lots of music...
Good thing the days are getting longer, I need the time, and the light.
Do you have any wonderful fiber art projects planned for the summer?
-Renee

Thursday, May 10, 2007

Storyboarding the Dye Project

I spent most of yesterday building my Dream Skein Winder. It is almost together but I had to wait until I could make another visit to the hardware store as the bolts and screws I had didn't quite work. A project like this always requires a few back-and-forth trips to the hardware store. I got a second pot of English walnut and hulls processed while I worked.
I was able to get to Home Depot last night as I usually ride up with my husband when he goes for one of his music rehearsals. I spend the time doing errands or studying. I actually did a little of both last night. After making a couple of stops, I settled into a Starbucks for an hour or so to work on the storyboarding process of organizing this project. Starbucks is the only coffee house in my area that stays open late enough for me to study or work while my husband is at rehearsal. I usually do this once a week. It gets me out of the house and saves us a bit of gas by doubling up.
I usually like to work in total silence, unless I am doing housework of course. I have found the trick that works for me when studying with conversation and music blaring all around me, I don't try to block it out, I just let it flow through my head. For some reason this works for me and I am able to concentrate on what I am studying. Most of the conversation around me is stereotypical, women talking about their families, men about their jobs or sports, teens about My Space everything. Every once in a while a fascinating conversation intrudes and my concentration is shattered. I was in the thick of it last night when the conversation next to me caught my attention. It was a soldier from Iraq telling war stories. What made me take a second look is this soldier was a young woman in her early twenties. She was a trauma nurse of some sort and was telling some rather hair-raising stories. She was also talking about her transition back into civilian life. It was suddenly in my face how shatteringly different a whole younger generation will be looking at the world. I am still digesting the ramifications of that conversation and how it affects us all.
Wrenching my thoughts back to the storyboarding process was, and is, a bit of a challenge but I want to explain this interesting little organizing tool. There are several ways one can organize a project of this size. Some use flow charts, cluster charts, and creative journaling. There is blueprinting,which is organizing the project like a blueprint of a house plan. Some people even use a technique called scoring that looks like a score of music. Sometimes it works just to wade in and let it take you where it will. For me, storyboarding works well.
To storyboard, I divided the project into categories. I have single colors, dye modifiers, color mixes, gradations, indigo, and yarn painting or ikat. For each dye, on an index card, I list the category, the dye or dyes, the form (roots, extracts, bugs, etc.), the process needed such as extraction, or mixing, the mordant and that will be used, such as alum or alum plus cream of tartar, and the color that I am aiming for. Each dye has several categories so there are several cards for each dye. When every dye is indexed, I will lay the cards by category in storyboard fashion so I will be able to see visually the steps needed and I won't have to keep it all in my head. Indigo has its own category because I will be using it to overdye some of the colors to get other colors. I will be able to see which colors will need a skein to be dyed to use in indigo. It would be very easy to get lost or lose track. I am doing this all up front since paper is a lot less expensive than dyes and the time. I am just about finished and will take a picture of the storyboard to share.
Please feel free to click on the comment link at the end of these posts and leave a comment. I am very interested in other fiber artist's experiences, knowledge, and questions.
I believe I asked this question before but will ask it again, Do you have a favorite organizing tool that you use? Have you ever tried storyboarding?
Now back to that skein winder....-Renee

Tuesday, May 8, 2007

The Outdoor Dye Kitchen

Here is a picture of my basic dye area. I have a table and a propane burner, various pots and pans, and a canopy covering all. In this picture, the dye pot has English walnuts (with hulls on) simmering. Last fall a group of us dyeing friends got together to dye with both English and Black walnuts. I gathered a few more walnuts at the urging of our generous hostess to take home with me to do a bit more dyeing. I was curious to see if letting them over-winter and decompose in water would make any difference to the dye results. I have had them sitting outside in two five-gallon buckets all winter. I took this picture yesterday as the walnuts were undergoing their first simmer. After letting them simmer for a full hour, I turned off the flame and have let them sit in the pot overnight. I had planned to strain the liquid today putting the leftover walnuts and hulls on the compost pile and saving the liquid for dyeing with, but I ended up having an unexpected errand day today.
My husband is a high school Spanish teacher and today he went on a field trip with the music students to see the Seattle Symphony. In case you are wondering why a Spanish teacher is going on a music class field trip, he is also an accomplished musician and occasionally helps out with school concerts. His website is listed in my “Personal Links” section. Yes, that is a shameless plug!
To get back to my story, I ended up taking him into work as we usually go climbing in the gym on Tuesdays after work. Logistics worked better for us if I took him in and picked him up on the way to the gym. Since I had the car today, I did a few errands to get the materials to complete my skeinwinder. I also stopped by the thrift store to get a blender for dyeing use and whatever else I could find. One find that I am smiling about is the Lego telephone I picked up for a couple of dollars to use in my studio! I am not fond of making phone calls so now I will have something fun to make them with. A lot of people may think this is silly but I think all you creative types out there will understand perfectly. Oh, I got a hand-held blender to use for the dyes too.
Do you have creative “toys” in your studio/weaving area?
Off to play! -Renee

Monday, May 7, 2007

Hair of the Dog

This is my dog Twill. She is a seven year old Yellow Lab mix. She is a very smart and very active dog which means she was a nightmare as a puppy but has turned into a wonderful, loving, and loyal companion who minds, most of the time. This post is about her fur and its potential for yarn. First I need to back up a bit.
The Whidbey Weavers Guild has a guild challenge, as do many of the guilds I belong to. Due to my personal circumstances, the Guild challenge just didn't fit into what I was able to do this year, or so I thought. Like many of the guilds belonging to ANWG (Association of Northwest Weavers Guilds), WWG is trying to put together a booth for the upcoming conference this summer. The plea has gone out for challenge items to put in the booth. I have been thinking hard what I could contribute given my circumstances and short amount of remaining time. The challenge this year is to work with a fiber you haven't worked with before. I actually have, ahem, in my stash, some silk wrapped stainless steel yarn from Habu yarns. I am looking forward to using this yarn but I really don't want to rush it. This weekend, my neighbor who owns three dogs, lent me a new dog brush she purchased called a FURminator. I tried it out on Twill this morning and a light bulb went on. Labrador Retrievers are a double-coated dog breed. They have a soft undercoat and a coarser overcoat. I have a few bags of her fur I have been saving and the FURminator very efficiently removed the shedding undercoat so that within five minutes, I had another bagful of fur... to spin for the guild challenge of course!
We have a local dog fur spinning expert, Megan. I have been watching her spin dog fur and knit and weave with it for several years now. Megan is one of the reasons I had been saving the dog fur in the first place knowing that I would like to try spinning it myself one day. Well, "one of these days" has arrived. The fur is going into a deodorizing bath first and then will be blended with wool. I will then try my hand at spinning her fur. All that will remain to decide is what to do with the yarn. Thankfully I will be seeing Megan at the guild meeting or spinning group soon and can get some advice.
Have you tackled a new-to-you fiber lately?
-Renee and Twill

Sunday, May 6, 2007

The Dream Skeinwinder

I am building a new skeinwinder. I have a wonderful one that my husband built that is adjustable and I crank manually. It is great for skeining off a cone or ball of yarn. I am now faced with making 375 skeins for the Earthues Dye Project! When I was purchasing the dye and talking with Cathy, she mentioned I could reserve some time with their skeinwinder which winds six skeins at once. I was very tempted by this generous offer but got to thinking how handy it would be to have one of my own. I also wanted to motorize it. As I love to tinker, build, and take things apart, I thought this would be a fun little project.
I found an older $7 sewing machine at Goodwill that had an external motor mounted on it. I took it home and completely took it apart. I had a lot of fun doing that. I have saved all the little bits and pieces in a box to play with like a metal Tinkertoy or Lego set. Most importantly, I have a motor with a pedal control. I decided to make the skeinwinder itself out of PVC pipe. Working with PVC is also a lot like working with Tinkertoys.
It is just about finished and I will see if my Dream Skeinwinder will become a reality. If not, I do have my manual one and I can just get cranking. When the winder is finished and working I will post a picture of it.
What are some of the creative solutions for your fiber-art needs that you have come up with?
Destructively and creatively yours, -Renee

Saturday, May 5, 2007

Earthues Dye Project: The Details

I don't always sit down and organize a weaving, spinning, or dyeing project. Of course, I do a few quick calculations for warp and weft before warping the loom and I will think about what kind of yarn I wish to spin. This project, however, requires a bit more planning. To start with, I decided to use only one yarn type. I will be using Crown Colony 2-ply wool yarn from Henry's Attic. I have 13 pounds of it. In my proposal I thought I would make my skeins 100 yards each, which came out to be about 133 skeins. After explaining this to Cathy at Earthues she suggested I make my skeins a bit smaller. She had a good sample of a skein of the same yarn I was using to show me. It looked like it would be a good amount for tapestry weaving and give me even more skeins to work with, about 375 of them! That seems like a lot but read on and you will see that it only scratches the surface!
I purchased quite a bit of dye. I bought the Reds and Colors Collection kits. Each kit will dye about 50 lbs of fiber. Having worked with Earthues once or twice before I knew I would want more of certain ingredients. I purchased additional Madder, some Weld flowers, and a dye substance called Quercitron which is from a variety of oak tree. I have never worked with Weld flowers or the Quercitron. It looks like I will be getting experience in the extraction process as well. The Reds Collection contains roots, bugs, and barks. The booklet says it contains "everything you need to know about cochineal, lac, and madder." The Colors Collection contains many of the natural dye extracts that Earthues carries. In fact, it seems to contain most, including indigo. Both of the kits I purchased come with instructional booklets. I took myself to a coffee house while my husband was at a band rehearsal and sat down to organize and read through the material.
There are many formal ways and tools to organize a project of this size. I have decided to storyboard it out. I like this system as I am, like many fiber artists, a visual person and I can view the whole project laid out. I will be describing this system in detail soon. For now I will say that 375 skeins is just a start! The first big task, after organizing the project, will be skeining off and washing, or scouring, the yarn. As I like to tinker with things I have a plan for that too....Stay tuned.
Do you have a favorite organizing "tool" you like to use when tackling a project? -Renee

Friday, May 4, 2007

A Visit to Earthues Natural Dyes

In a previous post, I have mentioned how I have received a grant from the Whidbey Weavers Guild. My proposal is to explore the use of Earthues Natural Dyes to dye tapestry yarns. My ultimate goal is to weave tapestries using organically produced wool, dyed with the least toxic natural dyes as possible, and still have the color lightfast and durable. I had planned to do my own independent experimentation in this area regardless but the grant will allow me to expand my project and to present it in a more formal format in which I can share the results for many years to come.
Earthues is owned and operated by Michele Whipplinger and is located in Ballard, WA. Ballard is in the Seattle metropolitan area. If you are ever in the area, Earthues is definitely worth stopping by. Click on the Earthues link in the Fiber Links sidebar to read about this wonderful enterprise and find the store hours.
I could have ordered the dyes and had a few of my generous friends bring them up to me but I really wanted to enjoy a visit to Earthues and a day in the city. I drove down and spent a couple of hours ordering dyes, browsing the beautiful items in the store, and getting tips and advice from the knowledgeable women who were working that day. I have to say a special thank you to Sandra, Kaitlin, Kathy, and Dana with apologies if I have misspelled your names! When I loaded up my car with my order I felt like my birthday had come early. I went on to visit the Weaving Works, located in the University District of Seattle and a few other stops along the way home.
That evening I took out all of the dyes and made an inventory so I could begin to organize the project. I don't want to waste any of the precious dye!
I will be posting the details, pictures, and progress of this project over the next several months. Please stay tuned and be sure to visit the Earthues website, you will be glad you did!
Do you have a favorite fiber art store in your area?
Colorfully yours, -Renee

Thursday, May 3, 2007

Whidbey Weavers Guild meeting

Today was the regular guild meeting for the Whidbey Weavers Guild. The drive to this guild is one of the most beautiful commutes ever. To get there I first drive across the Skagit Valley countryside. The Skagit Valley has just finished up the Tulip Festival, which draws thousands of tulip tourists for the month of April. This morning it was calm and the farmers were out working their fields. From the Skagit Valley I continue my drive onto Whidbey Island. One crosses to Fidalgo Island and then onto Whidbey via bridges. The bridge to Whidbey Island spans Deception Pass. The view as you get onto the bridge is always breathtaking. The bridge is narrow and very high above the water so you have to keep your eyes on the road while sneaking quick peeks. Fortunately there are places to turn out before and after to take a longer look.
I had my dog Twill with me today so our first stop was Deception Pass State Park to stretch our legs and such. The Guild meets at Camp Casey just outside of the town of Coupeville. I like to make a quick stop in Oak Harbor at Starbucks to grab a mocha before continuing on to the meeting. When I have Twill with me I go extra early so that I can walk her on the beach. From the beach you look across the Sound to the Olympic Peninsula and Mountains. The sky was quite dramatic today with sunshine and large storm clouds sweeping across Puget Sound. The wind coming off the Olympic Mountains was still quite chilly.
The program for the Guild today was on the Feldenkrais Method of movement presented by Julie Gersten, a Feldenkrais Method teacher who teaches in Langley, WA. She specifically addressed the problems we can run into when using our bodies to weave, spin, and knit. I have heard of this method before but this was the first time I actually tried some of the exercises. The results of our short session impressed me enough that I will be looking into it more. I want to be weaving comfortably for many years to come. I started weaving in my late 30’s and have already experienced minor physical challenges due to the motions. We always tend to ignore our bodies until something becomes painful and insists we pay attention to it. Our “no pain, no gain, grin and bear it” society doesn’t really help either. The program was a wonderful and important one that should be included in any guild’s line-up of programs.
With all this in mind I would like to ask: What steps, if any, do you take to keep your body weaving and moving in a healthful way?
Here is to joyful weaving and movement! -Renee

Wednesday, May 2, 2007

The Great Yarn Stash Challenge

I love weaving guilds. In fact, I belong to four of them! The first one I joined as a very beginning weaver was Skagit Valley Weavers Guild. This is the guild I consider my home guild. It is a lovely, warm, supportive group of weavers, some of whom have been weaving for over 30 years. I have found all of them to be enthusiastic weavers, spinners, and fiber artists. The second guild I joined was the Whidbey Weavers Guild, followed by the Seattle Weavers Guild and then, in the past couple of years, I joined the Whatcom Weavers Guild. All of them have their own culture that is different from the others. I don't make all the meetings for all of the guilds but I do make one or two a month.
One of the many side benefits of belonging to a guild is the unofficial and sometimes official yarn and equipment sales. These are a great source for bargains of yarn and equipment. A beginning weaver can quickly build up a stash of materials to weave with for a good price. Before you know it, you have an impressive stash. There are a couple of things you can do to manage your stash when it threatens to topple and bury you in a mound of yarn. You can continue to stash until eventually a relative has the task of holding a yarn sale for the guild to recycle all that yarn back into other weaver's stashes. You can also get in the de-cluttering mode and bring the yarn to the guild yourself to sell back to other weaver's looking for a good deal on yarn. I managed to sell of half my yarn stash in this manner. There is another way to thin the stash out and that is to actually weave it all up. I am finding that is easier said than done!
I started weaving my stash off in January. Sort of a New Year's resolution, if I made them, which I don't! To deal with the sheer volume I decided to keep it very simple. I put a black cotton warp on at 4 epi and wove a weft-faced plain weave starting with the thickest yarns I had, including handspun yarn. For someone who loves fine threads, I sure had a lot of thick yarns. I put on about 10 yards of warp at a time and for several weeks, was weaving off the 10 yards every week. As I finished each warp, I measured and weighed the fabric off the loom and have been recording it. I am also keeping the empty cones for now just to have the visual satisfaction of seeing all the cones I have used up. As I have used up the thicker yarns, I have had to increase the sett for the increasingly finer threads. The warp that is going on the loom now is a balanced plain weave 40" wide and sett at 12 epi. That number will get even larger as I continue to work my way through. I am almost out of wool yarn and will be starting on the cottons, then linens, and finally silk and miscellaneous fibers.
So, what am I going to do with all of the yards of fabric? Keep it simple, I will be making tote bags to sell at the various guild sales. Three of the four guilds I belong to have sales.
So my question for the day is:
Do you have a stash? How do you manage it?

Tuesday, May 1, 2007

Welcome

I am a weaver. There, I said it! When people ask me what I "do" this is how I respond. Many people smile and ask what kind of sweaters I knit, but many respond with wonderful stories about relatives, acquaintances, or even how they themselves weave, or spin, or create with fiber. It usually makes for a good ice breaker.
I have been weaving for about eight years or so. Like many beginning weavers and not-so-beginning weavers, I have dabbled in many areas of weaving both structure-wise and color-wise. I am only now starting to narrow my focus. I have become very interested in tapestry weaving and am taking the first steps in that life-long journey. Like any fiber artist, I have built up quite a yarn and fiber stash. My challenge to myself is to weave up all those odd cones of yarn I have acquired. I started in January and to date have woven off over 40 yards and about 20 pounds of yarn with more to go. More about my "Great Yarn Stash Challenge" later.
My biggest project at this time is thanks to the Whidbey Weavers Guild and the generous grant I received from the guild this spring. I will be experimenting with Earthues natural dye extracts and will be posting pictures and comments about the process in the coming days. The dye area is all set up, the dyes purchased, and I am just about ready to go. So please stay tuned and check in. I will leave with this question:
Do you have a focus in your fiber art? Please feel free to tell about it and how you got there.
Go weave! -Renee